Keeping macOS Apps updated with App Auto-Patch and Intune
Now that there are so many players in the macOS app management space, how exactly do we keep these apps current and importantly, secure?

One thing I’ve learned over the last 18 months or so, is just how congested the app management space is for Intune enrolled Windows and macOS devices; with everyone clambering to have the best offerings, unified portals, cloud-first approach, or latest functionality.
What about keeping these apps up to date? There must be easier ways than pushing the new versions of apps from MDM solutions?
And what’s wrong with just using Intune and some open-source software to make sure your devices are running current software?
Well nothing, if it’s good enough for Jamf it’s certainly good enough for Intune.
App Auto-Patch
There are a handful of options to support the update of applications already installed on macOS devices, one of those is App Auto-Patch which leans on, and adds to the functionality of Installomator, and using swiftDialog can provide users with notifications and interactive messages when updating a set list of apps on the devices.
So how do we get App Auto-Patch configured and deployed to our Intune enrolled devices, making sure we’re not exposing our environments to app-based security vulnerabilities?
User Interaction
First off, and importantly, if we want our end users to see what App Auto-Patch is doing, and give them the option to install or defer any app updates (because they’re busy little bees), then we need a way to display notifications and update progress to them.
As mentioned, App Auto-Patch uses swiftDialog for these notifications, so we just need to make sure that our macOS fleet (Is “fleet” a mac thing? I’ve always used “device estate”), has this app installed, so off you trot and download the swiftDialog installer from the releases page, and quickly punt it into Intune and deploy it to your “fleet” (One of us, one of us).

With the app installing (to test devices first), we can now look at the App Auto-Patch configuration settings, that configure update and installation behaviour.
App Auto-Patch Settings
User notifications sorted, we’re going to trawl through the available config settings for App Auto-Patch and pull out the ones we need as a minimum to ensure that our macOS fleet are running up to date apps.
For now we’ll focus on just getting all apps updated; so with that in mind, we’ll need to create a new mobileconfig file and deploy it as a custom policy in Intune, with the combined settings in the below sections.
App Settings
These cover the general look and feel of App Auto-Patch, including the support information displayed within the app, whether the app will update itself, and configure the user experience.
| Setting | Value | Detail |
|---|---|---|
| AppTitle | Intune App Auto-Patch |
Changes the name of App Auto-Patch to something else |
| DialogOnTop | True |
Forces AAP to stay on top of all other windows |
| SelfUpdateEnabled | True |
Determines if AAP will automatically check for updates |
| SelfUpdateFrequency | monthly |
Determines how frequently AAP will automatically check for updates |
| InteractiveMode | 2 |
0 (Completely Silent) 1 (Silent Discovery, Interactive Patching) 2 (Full Interactive) (default) |
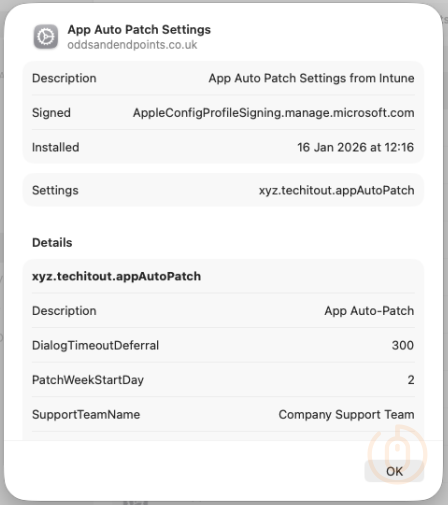
| PatchWeekStartDay | 2 |
1 through 7 (1=Mon 2=Tue…7=Sun) |
| SupportTeamName | Company Support Team |
For the Support Team details that display in the Help Message |
| SupportTeamEmail | support@company.com |
For the Support Team details that display in the Help Message |
| SupportTeamPhone | 118 118 |
For the Support Team details that display in the Help Message |
| SupportTeamWebsite | support.company.com |
For the Support Team details that display in the Help Message |
Deferral Options
As we might not want to disrupt our users too much, we can configure the deferral options so they’re not forced to install the updates immediately, but they will be forced to install the updates eventually.
| Setting | Value | Detail |
|---|---|---|
| DeferralTimerError | 60 |
Amount of time in Minutes that AAP will defer if any errors are detected throughout the process |
| DialogTimeoutDeferral | 300 |
Time in seconds given to the user to respond to deferral prompt if enabled |
| DialogTimeoutDeferralAction | Defer |
What happens when the deferral timer expires (Continue/Defer) |
| DeferralTimerMenu | 30,60,90,480,720,1440,2880 |
Allows you to provide multiple deferral time options instead of the default of one day |
Deadline Options
These configure at what point after deferrals the app updates are installed, we need these otherwise no apps get updated and it kinda defeats the object of managing app updates 😂.
| Setting | Value | Detail |
|---|---|---|
| DeadlineCountFocus | 3 |
Number of deferrals allowed for incidents such as Active Display Assertions, Focus/DND mode. This type of deferral will be done silently and no prompts will be displayed for the user. Deferral time set by DeferralTimerFocus |
| DeadlineCountHard | 3 |
Number of deferrals allowed by the end-user |
Installomator Options
The below essentially covers what apps are out scope of the update, as we want to unify the update experience, we’re only excluding some apps, so we don’t have to rely so much on Microsoft AutoUpdate for installation of Microsoft apps.
| Setting | Value | Detail |
|---|---|---|
| IgnoredLabels | googlechrome* microsoftonedrive-* microsoftonedrivesuprod microsoftonedrivesuinsiders firefox* |
Basically a list of apps that self-update or apps that have issues with installomator, space-separated and wildcards supported |
| ConvertAppsInHomeFolder | True |
Remove apps in the ‘/Users/*’ folder and install them to the default path |
| InstallomatorOptions | BLOCKING_PROCESS_ACTION=prompt_user NOTIFY=silent LOGO=microsoft |
A space-separated list of options to override default Installomator options |
| InstallomatorVersion | Main |
Determines if the AAP script should use the Main (beta) or Release version of Installomator. |
| RemoveInstallomatorPath | False |
Remove Installomator after App Auto-Patch is completed |
During testing my OneDrive client seemed to look for updates against a number of labels (microsoftonedrive-deferred, microsoftonedrive-rollingoutdeferred, microsoftonedrivesuinsiders,microsoftonedrivesuprod, microsoftonedrive), which is why there are some OneDrive specific ignored labels in the configuration file.
You might need to adjust these and other ignored labels for your own environment, which is why we test things first.
Intune Configuration
With the settings reviewed and gathered, we can now use Intune to deploy the App Auto-Patch settings, some other required profiles, and of course App Auto-Patch itself.
Custom Policy
Using all the above settings as reference, we can create our own mobileconfig file based on the sample xml provided for Intune, and deploy it to our devices.
<?xml version="1.0" encoding="UTF-8"?>
<!DOCTYPE plist PUBLIC "-//Apple//DTD PLIST 1.0//EN" "http://www.apple.com/DTDs/PropertyList-1.0.dtd">
<plist version="1.0">
    <dict>
        <key>PayloadUUID</key>
        <string>21ffca42-9209-41e2-8e63-da16af676121</string>
        <key>PayloadType</key>
        <string>Configuration</string>
        <key>PayloadOrganization</key>
        <string>xyz.techitout.appAutoPatch</string>
        <key>PayloadIdentifier</key>
        <string>xyz.techitout.appAutoPatch</string>
        <key>PayloadDisplayName</key>
        <string>App Auto-Patch Settings</string>
        <key>PayloadDescription</key>
        <string>App Auto-Patch Settings from Intune</string>
        <key>PayloadVersion</key>
        <integer>1</integer>
        <key>PayloadEnabled</key>
        <true/>
        <key>PayloadRemovalDisallowed</key>
        <true/>
        <key>PayloadScope</key>
        <string>System</string>
        <key>PayloadContent</key>
        <array>
            <dict>
                <key>PayloadDisplayName</key>
                <string>App Auto-Patch</string>
                <key>PayloadIdentifier</key>
                <string>xyz.techitout.appAutoPatch</string>
                <key>PayloadType</key>
                <string>xyz.techitout.appAutoPatch</string>
                <key>PayloadUUID</key>
                <string>515b818d-d81e-435a-946f-9e84018d916b</string>
                <key>PayloadVersion</key>
                <integer>1</integer>
                <key>AppTitle</key>
                <string>Intune App Auto-Patch</string>
                <key>DialogOnTop</key>
                <string>TRUE</string>
                <key>SelfUpdateEnabled</key>
                <true/>
                <key>SelfUpdateFrequency</key>
                <string>monthly</string>
                <key>InteractiveMode</key>
                <string>2</string>
                <key>IgnoredLabels</key>
                <string>googlechrome* microsoftonedrive-* microsoftonedrivesuprod microsoftonedrivesuinsiders firefox*</string>
                <key>ConvertAppsInHomeFolder</key>
                <string>TRUE</string>
                <key>InstallomatorOptions</key>
                <string>BLOCKING_PROCESS_ACTION=prompt_user NOTIFY=silent LOGO=microsoft</string>
                <key>InstallomatorVersion</key>
                <string>Main</string>
                <key>RemoveInstallomatorPath</key>
                <string>FALSE</string>
                <key>PatchWeekStartDay</key>
                <integer>2</integer>
                <key>DeferralTimerFocus</key>
                <integer>60</integer>
                <key>DeadlineCountFocus</key>
                <integer>3</integer>
                <key>DeferralTimerError</key>
                <integer>60</integer>
                <key>DialogTimeoutDeferral</key>
                <integer>300</integer>
                <key>DialogTimeoutDeferralAction</key>
                <string>Defer</string>
                <key>DeferralTimerMenu</key>
                <string>30,60,90,480,720,1440,2880</string>
                <key>DeadlineCountHard</key>
                <string>3</string>
                <key>SupportTeamName</key>
                <string>Company Support Team</string>
                <key>SupportTeamPhone</key>
                <string>118 118</string>
                <key>SupportTeamEmail</key>
                <string>support@company.com</string>
                <key>SupportTeamWebsite</key>
                <string>support.company.com</string>
            </dict>
        </array>
    </dict>
</plist>
Configuring the policy in Intune like the below.
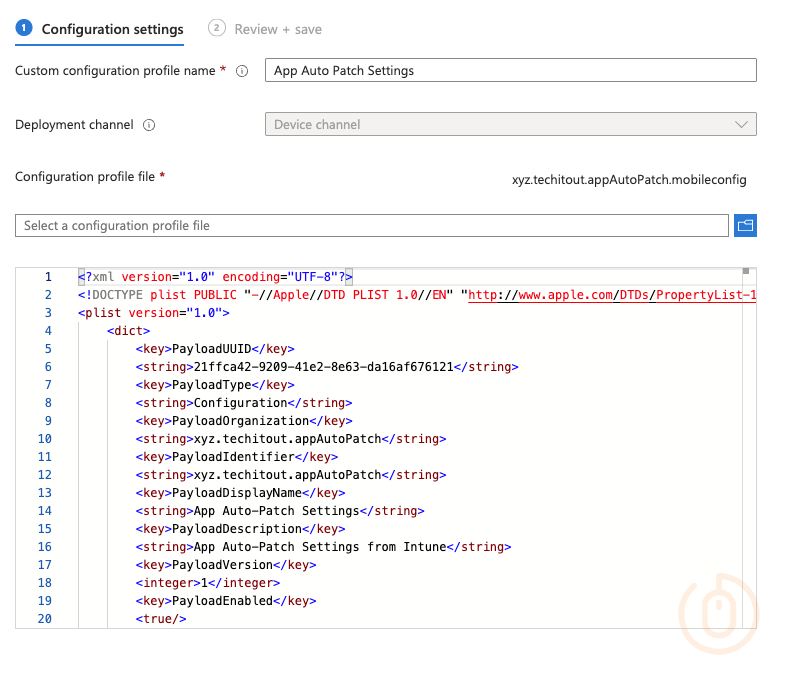
With this Custom Policy deployed to devices, when we push out App Auto-Patch itself, it will have a set of configuration values to work from.
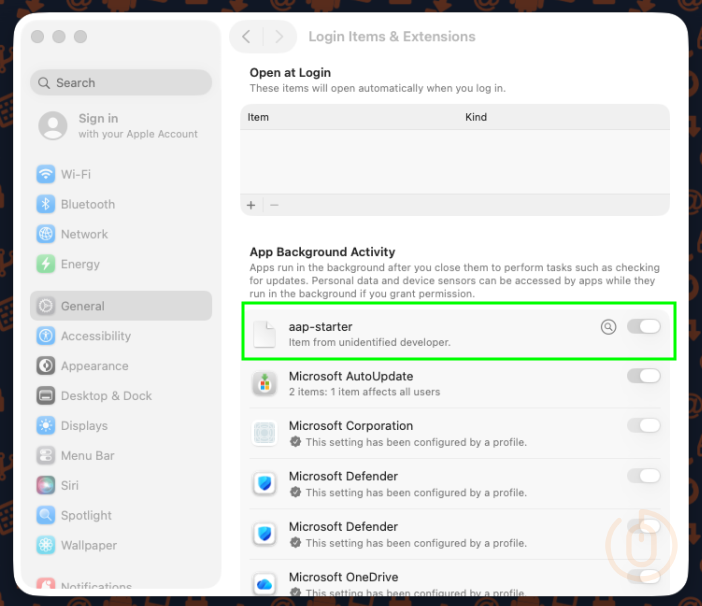
Managed Login Items
Even if as part of the installation App Auto-Patch will add an agent to the managed login items we want to make sure that it stays there and doesn’t get removed by a rogue user.
There is a sample mobileconfig profile available to deploy as a Custom Policy, or you can just create a Settings Catalog policy using the below settings to do exactly the same thing.
| Category | Setting | Value |
|---|---|---|
| Login > Service Management - Managed Login Items | Rule Value | xyz.techitout.aap |
| Login > Service Management - Managed Login Items | Rule Type | Label |
| Login > Service Management - Managed Login Items | Comment | App Auto-Patch LaunchDaemon |
Deploying this to the macOS devices finally puts us in a position where we can deploy the App Auto-Patch using Intune.
App Auto-Patch Installation
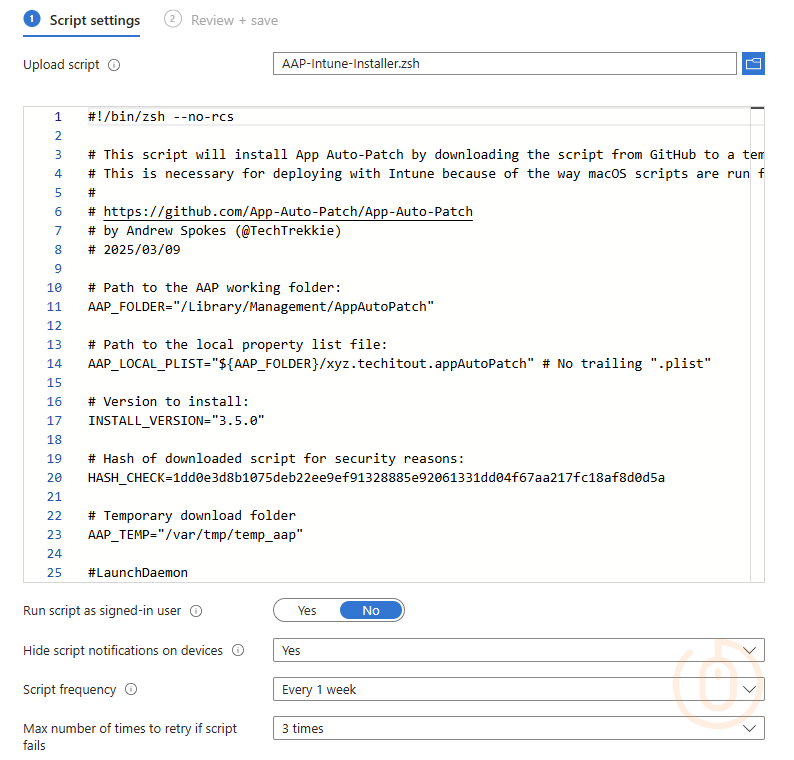
Right, last bit of effort to push out App Auto-Patch to your macOS devices, we’ll be using the provided shell script as a reference, and update it to support the latest version of the app (3.5.0 at time of writing).
#!/bin/zsh --no-rcs

# This script will install App Auto-Patch by downloading the script from GitHub to a temporary location and running the script to perform the install
# This is necessary for deploying with Intune because of the way macOS scripts are run from Intune, leaving out necessary variables to self-install
#
# https://github.com/App-Auto-Patch/App-Auto-Patch
# by Andrew Spokes (@TechTrekkie)
# 2025/03/09

# Path to the AAP working folder:
AAP_FOLDER="/Library/Management/AppAutoPatch"

# Path to the local property list file:
AAP_LOCAL_PLIST="${AAP_FOLDER}/xyz.techitout.appAutoPatch" # No trailing ".plist"

# Version to install:
INSTALL_VERSION="3.5.0"

# Hash of downloaded script for security reasons:
HASH_CHECK=1dd0e3d8b1075deb22ee9ef91328885e92061331dd04f67aa217fc18af8d0d5a

# Temporary download folder
AAP_TEMP="/var/tmp/temp_aap"

#LaunchDaemon
appAutoPatchLaunchDaemonLabel="xyz.techitout.aap"

# function to delay until the user has finished setup assistant.
waitForDesktop () {
    until ps aux | grep /System/Library/CoreServices/Dock.app/Contents/MacOS/Dock | grep -v grep &>/dev/null; do
        delay=$(( $RANDOM % 50 + 10 ))
        echo "$(date) |  + Dock not running, waiting [$delay] seconds"
        sleep $delay
    done
    echo "$(date) | Dock is here, lets carry on"
}

# Wait for Desktop
waitForDesktop

# Report if the AAP preference file exists.
if [[ -f "${AAP_FOLDER}/appautopatch" ]]; then
    if [[ -f "${AAP_LOCAL_PLIST}.plist" ]]; then
        AAP_version_local=$(defaults read "${AAP_LOCAL_PLIST}" AAPVersion 2> /dev/null)
        [[ $(echo "${AAP_version_local}" | cut -c 1) -lt 4 ]] && AAP_version_local=$(grep -m1 -e 'scriptVersion=' -e '  Version ' "${AAP_FOLDER}/appautopatch" | cut -d '"' -f 2 | cut -d " " -f 4)
        [[ -n "${AAP_version_local}" ]] && echo "<result>${AAP_version_local}</result>"
        [[ -z "${AAP_version_local}" ]] && echo "<result>No AAP version number found</result>"
    else
        echo "<result>No AAP preference file</result>"
        AAP_version_local="FALSE"
    fi
else
    echo "<result>Not installed</result>"
    AAP_version_local="FALSE"
fi

#Script to deploy App Auto-Patch in Microsoft Intune.

#Check for expected version
if [[ ${AAP_version_local} = "FALSE" ]]; then
    echo "No local version found to perform check, skipping"

    elif [ $INSTALL_VERSION = ${AAP_version_local} ]; then
    exit 0
fi

#Download expected version
mkdir -p $AAP_TEMP && cd $_
curl -L -O https://raw.githubusercontent.com/App-Auto-Patch/App-Auto-Patch/$INSTALL_VERSION/App-Auto-Patch-via-Dialog.zsh

#Check the downloaded file against expected hash
if ! echo "$HASH_CHECK  $AAP_TEMP/App-Auto-Patch-via-Dialog.zsh" | shasum -a 256 -c -; then
    echo "Checksum not matching or download failed" >&2
    exit 1
fi

#Install App Auto-Patch
chmod a+x $AAP_TEMP/App-Auto-Patch-via-Dialog.zsh
$AAP_TEMP/App-Auto-Patch-via-Dialog.zsh --reset-defaults --reset-labels

sleep 5
launchctl bootstrap system "/Library/LaunchDaemons/${appAutoPatchLaunchDaemonLabel}.plist" &
disown

rm -rf $AAP_TEMP

exit 0When installing App Auto-Patch using this shell script, it will get the actual installation script for the version specified in the INSTALL_VERSION variable and run it on the device, so make sure your devices can get to the required GitHub network endpoint.
HASH_CHECK in the Intune script, or at least validate it first before deploying using Intune. Also, make sure the hash is in lowercase #justunixthings 😅.After adding this shell script in Intune configured as below, we’re at the point where we wait for devices to run the script, and make the App Auto-Patch tool available.
User Experience
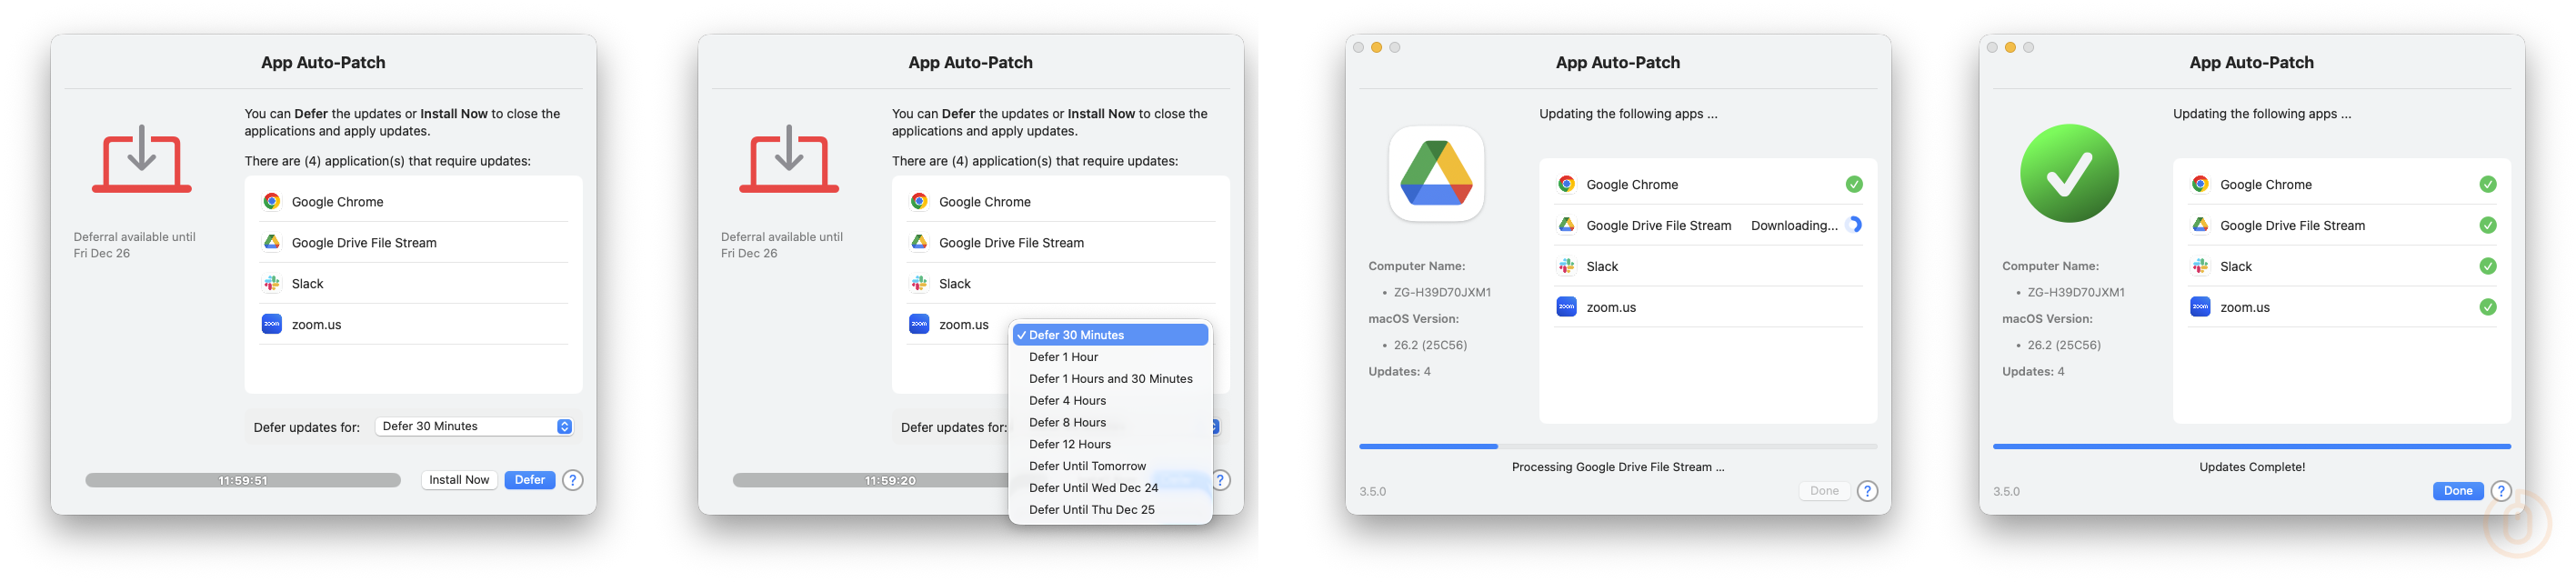
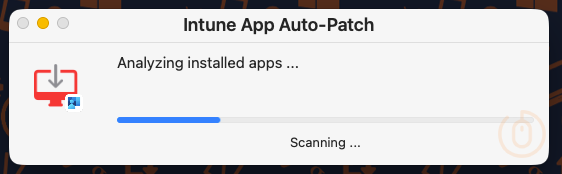
Once the shell script has deployed and installed the App Auto-Patch script, users will first be presented with the below window (this is because we configured full visibility using the InteractiveMode setting) showing the status of the analysation (ahem) process.
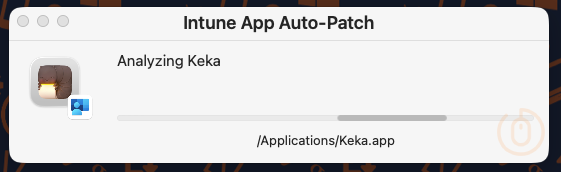
It will detect the applications not excluded by the ignoredLabels configuration, so that means apps like Keka…
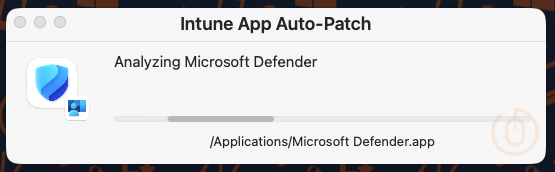
and our Microsoft apps like Defender…
Once this has completed, users will be prompted to start the update of any apps that are not current.
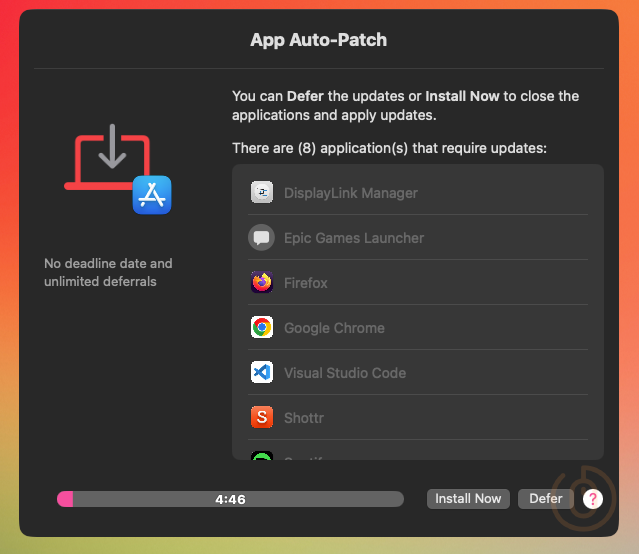
Giving them the option to defer the installation based on the settings configured in the Custom Policy deployed from Intune.
If they choose to start the installation now, or if they defer the installation enough times that it hits the configured deadline, App Auto-Patch will start the installation process.

With users being notified to close any apps that need to be closed to allow the update to complete.
Summary
Now before you just go and deploy everything into your own Intune environment, and expect it to just work, I’d suggest reviewing the App Auto-Patch wiki and check the functionality manually first using appautopatch --reset-defaults --reset-labels after you’ve installed the app on a test device; you know, just to see what actually happens.
You may need additional configuration settings or you might like to make changes to the suggested settings for your own environment, instead of just blindly copy and pasting what someone on the internet said was a good idea.
As much as device or user driven app updates are pretty cool, there is a bit of a gap regarding reporting, so if you’re expecting a fully fledged enterprise level solution for macOS app management including status updates of installed app versions, well for that you need to find some cash. If however, you’re in a pinch, and just need to make sure your fleet is running up-to-date apps, then there shouldn’t be any issue with your using open-source software to support that requirement, at least in my books.